
Photo by Zilpha Young
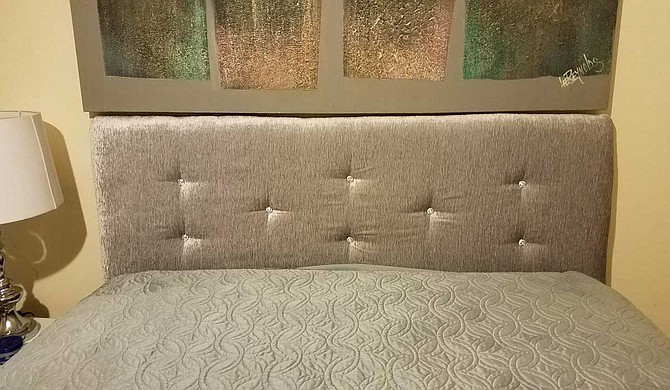
Do you have five-star taste, but a one-star budget? Then this project was made for you. I wanted to give my bedroom a facelift for the new year, and I decided the perfect start would be a glam new headboard. The whole thing came together for under $50 (not including tools), and I am in love with the final result. I splurged a bit on the ultra shiny buttons and metallic fabric, but you can use whatever materials suit your style and budget.
Materials
Plywood or particle board at least 1/2-inch thick and cut to the size you want your headboard
Piece of foam cut the same width and height as the plywood board. Check out NUTS or other thrift stores for those foam mattress toppers. I bought a big one for under $5 and have been cutting from it for different projects for years.
Two yards of batting
Two yards upholstery fabric buttons
Somewhat heavy, rigid wire
Bobby pins
Two 1-inch-by-4-inch boards cut to the height you need for your headboard
Staple gun and staples
Four screws
Drill
Directions
Head Board
Start by making holes in the plywood where you want the buttons to go on your finished headboard. First draw out an even grid on the wood, and circle the places where the lines cross that you want the buttons to go. Then, drill through all the places you marked. For mine, I made a pattern of two, one, two, one, two going across.
Next lay down the fabric (face down), batting and foam, followed by the board. You should have several inches of fabric and batting around the edged of the foam and board.
Pull the fabric and batting up and around the board, and staple it to the back. Start by just putting two or three on each side, and then go around and add more to tighten the fabric evenly all the way around.
Buttons
There is definitely more than one way to do this, but this is the way I did mine with what was lying around.
Cut your wire into pieces that will be long enough to go through the board, foam and fabric (it helped me to cut the wire at an angle to the tip was pointed). Poke the wire through the holes you drilled into the board until it comes through the front of the headboard. You may have to wiggle the wire around a little to get it to poke through.
Use the end of the wire coming through the front to loop into the back of your button, turn the wire back and twist it a few times so it's secure.
Push the button back in while you pull from the other side and loop the back end of the wire onto a bobby pin, and twist it until you get the desired depth for your button. Repeat for every other button hole you pre-drilled.
Legs
Finally, add legs. Just lay the legs down on the back of the finished headboard and screw them in. Be sure to use screws are long enough to go through both the legs and the board, but not so long that they might poke you form the front. I placed mine closer to the middle so they can't be seen from the side of the bed.
Put the headboard behind your bed and bask in the glow of accomplishment. You could also mount it to the wall with some different hardware, but I'm not that fancy.
Do you like DIY projects? Email ideas to [email protected].
Support our reporting -- Follow the MFP.

Comments
Use the comment form below to begin a discussion about this content.
comments powered by Disqus