Mateo, my son, loves Halloween. He claims it is one of his favorite days of the year, but he says that about his birthday and Christmas, too. I like Halloween, not so much for the candy, but because it's a fun time of year to decorate.
At Mateo's school last year, we had our first experience with decorating a pumpkin. In years past, we had always carved our pumpkins֖it's a Jacome father-and-son tradition. But, last year we were opened up to a whole new world of pumpkin fun.
Although I like to doodle now and again, I am not an artist. I had to rely on what I am good at to help Mateo decorate his pumpkin: decoupage. We printed out fun pictures, bought stickers and used glow-in-the-dark paint to create our masterpiece to decorate the halls of his elementary school.
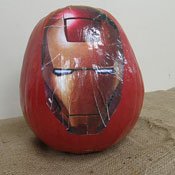
This year, we decided to do an ode to Iron Man. This project is super easy and very kid friendly.
Materials
Scissors
Pencil
Spray paint
Bottle of Mod Podge*, Gloss Finish
Gel glue stick
Paintbrush
Pumpkin
Magazine clippings, old newspapers, gift wrap, old greeting cards, coloring book pages or printed images from your home computer
Painting drop cloth
*Mod Podge can be found in craft or general merchandise stores. You can also make your own decoupage solution using regular white school glue. Mix ratios of 1:1 for glue and 3:1 for sealing. I prefer the Mod Podge because it does both and it's got a nice sheen to it.
Options:
If you are artistic, free-hand a scene or face onto your pumpkin using a marker and fill it in with acrylic paint. After it dries, use the decoupage solution to seal it.
Find odds and ends around your house to make a three-dimensional pumpkin. Use stickers, tissue paper, old feathers, scraps of materials, googly eye֖the sky is the limit. Make your pumpkin fun and unique.
Using a thick tipped permanent market, write your own fun sayings֖"BOO" or "Happy Halloween"֖or personalize with your family's name to set on your front patio.
Instructions:
1. Paint
This step is best done outside. Lay down your painting drop cloth. Spray paint the entire surface of your pumpkin. It should be dry to the touch in about an hour. Bring your pumpkin into the house and let it dry completely overnight.
Tip: If you like the orange pumpkin color, you can omit this step.
2. Prepare your image
While the pumpkin is drying overnight, you can start preparing your images to use the next day. I printed out our images on our home printer and let Mateo cut them out.
Tip: You can let your child create a "my favorites" pumpkin with all their favorites things: food, movies, books, etc. Or select an overall theme like cars, dinosaurs, superheroes, flowers or butterflies.
3. Picture placement
Decide where you want all your images to go before you start working with the spray adhesive. You can make little pencil marks in the flesh of the pumpkin. Don't go too deep, though, you don't want to ruin your final project.
4. Did someone say pumpkin?
Using the pencil marks you made earlier as your guide, have your child place the images onto the pumpkin. Use your fingers to smooth out air bubbles. Continue this process all around pumpkin until you have used all your images. Let dry for five or 10 minutes.
Tip: If you are adding any other items like stickers, tissue paper or other optional items, do so now before applying the decoupage solution.
5. Bring on the sticky
With your drop cloth laid out on a flat surface, turn over all images so that the back is facing up. Put an even layer of gel glue on the back of your images; make sure to get the edges. Allow to dry for two to three minutes.
Tip: I've used spray adhesive in the past. It works well, but is really sticky to work with. If you are using a lot of images, only spray two or three images at a time.
6. Decoupage time
Using your paintbrush, apply two coats of decoupage solution onto the entire pumpkin. This is really fun for the kids to do. Let the first coat dry before applying a second. The decoupage solution seals the entire pumpkin.
Tip: Let the pumpkin dry overnight before taking it to school or using it to decorate around your house.
7. Enjoy and display!
Don't forget to take pictures of your pumpkin creation to share with family and friends.
More stories by this author
Support our reporting -- Follow the MFP.